|
| Installing DLGuard Manually |
|
|||||||||||||||||||||||||||||||||||||||||||||||||||||||||
|
|||||||||||||||||||||||||||||||||||||||||||||||||||||||||
|
This guide is designed to show you how to install DLGuard to your website manually. This option is recommended for Mac users who cannot run Windows executable files, Linux users who can't run Windows executable files, and advanced users.
After downloading your installation file, unzip the contents of the zip file onto your computer, and then follow the steps below:
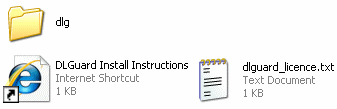
Step 1: View your files
After unzipping the files from the ZIP file you downloaded, you will see a folder and two files. The installation instructions file will link to this help document. The dlguard_licence.txt file contains the licence agreement for using DLGuard. Make sure you read this before uploading DLGuard to your website. Lastly, you'll see the folder labelled "dlg". This is the folder that contains all the files you need to upload to your website.
Step 2: Uploading DLGuard to your website To upload DLGuard to your website, the easiest way is to do so by using an FTP program. Create a folder on your website named "dlg". You will then need to upload the files INSIDE the "dlg" folder on your computer INTO the new folder named "DLG" on your website that you just created.
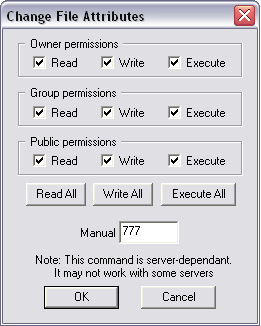
Step 3: Changing file permissions After you have uploaded your files onto your website, you will need to change the file permissions of a folder and some files so that DLGuard can operate. File permissions are settings that you attribute to a file or a folder that tell your website to allow DLGuard to save configuration settings and other data. You will need to change the permissions of the "admin" folder inside DLGuard to CHMOD 777 You will then need to change the permissions of the files INSIDE the "data" folder to CHMOD 666 (Please note, do NOT change the "data" folder's permissions to 666, you need to change the permissions of the files INSIDE this folder ONLY to 666)
The easiest way to do this is via FTP. So Log in to your website using your FTP software. Each FTP software application is slightly different, however most operate similar to this: Navigate to your DLGuard folder on your website. Inside the DLGuard folder you should see a folder named "admin". Right-click on the "admin" folder. There should be an option that says something like "Set Permissions", "Change File Attributes", or "Properties". Click on this. You will see a series of tick boxes, and maybe a box that allows you to type in the CHMOD value itself as listed in the DLGuard instructions. If you can type your file permissions in, type in "777". If you need to select tick boxes, you want to select: All read, All write, All execute There is an example below:
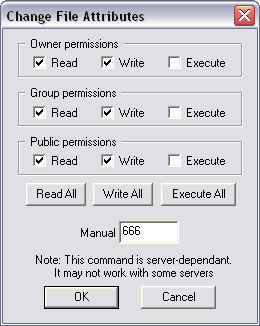
Once you have changed the file permissions of your "admin" folder to CHMOD 777, you will then need to go to the "data" folder (dlg/admin/data/) and change the permissions of the files INSIDE the data folder (NOT the folder itself, but the files INSIDE the folder!) to CHMOD 666 (or Owner read/write, Group read/write, and Public read/write). For example:
Step 4: Navigate to the "install" folder Next, open up your browser window and type the location of your "install" folder on your website into the "address" bar. Your "install" folder is held inside the folder into which you uploaded DLGuard. For example: http://www.example.com/dlg/install/
Step 4(b): IonCube Loader issues When using the automatic installation of DLGuard, IonCube Loaders are automatically installed onto your website. Since you're using the manual installation method, you MAY need to upload these to your website. If when you go to your "install" folder as described in the steps above you see the DLGuard install webpage displayed, then you're fine - you don't need to upload IonCube Loaders to your site. In this case, simply continue on to Step 5. IF, however, when you go to your "install" folder you see an IonCube Loader Error message, then you will need to upload IonCube loaders to your website.
Step 5: Follow the on-screen installation instructions You can click the "Test File Permissions" link if you wish to make sure you've set up the file permissions correctly. Then click the Next link. You will be asked to specify a login username and password that you wish to use with DLGuard, as well as enter MySQL database details (for help creating a MySQL database, simply ask your hosting provider and they'll either create one for you, or give you instructions on how to do so on your particular hosting control panel).
Step 6: Next you will need to change the file permissions of your "admin" folder from 777 back to 755 (If you're not sure how to change file permissions, read below). DON'T change your "data" files back, ONLY your "admin" folder itself.
Lastly you will need to delete your "install" folder from your website. This folder is held inside your "dlg" folder. For example: http://www.example.com/dlg/install/ Once this is complete you can Login to DLGuard by clicking the Login link.
Logging In To DLGuard: To login to DLGuard, all you need to do is point your web browser to your "admin" folder in DLGuard. So for example: http://www.example.com/dlg/admin/ (...where "example.com" is your domain name, and "dlg" is the folder into which you installed DLGuard)
All done! * Note: When first logging in to DLGuard you will be asked to enter your receipt number. You will only be asked this once. If you experienced any problems installing DLGuard, please view the Common Installation Questions here.
These instructions are designed for advanced users only! They are the same as the instructions above, only MUCH briefer, and won't go into details that advanced user's already know. They are designed for advanced users to quickly find the information they need. If these instructions don't make sense to you, then read the instructions above. Step 1: Download and unzip the DLGuard zip file you were sent when purchasing. Step 2: Create a folder named "dlg" on your website, and upload the contents of the "dlg" folder found in the ZIP file INTO the "dlg" folder on your website. Step 3: Change the file permissions for the following folder and files:
Step 4: Point your browser to the "install" folder inside your "dlg" folder Step 4(b): If you are shown an IonCube Loader error, you will need to upload IonCube Loaders. Get the loaders you need from this site: http://www.ioncube.com/loaders.php Next, create a folder named "ioncube" inside your "dlg" folder, and upload the loaders you need into this folder. If the IonCube Loader error is still displayed then you'll need to contact your hosting provider and ask them to install IonCube Loaders onto your website for you. In most cases this should would fine, however. Step 5: Once the install page is displaying okay, simply follow the on-screen instructions to create login details and specify your MySQL database details. Step 6: Lastly, change the file permissions of your "admin" folder back to CHMOD 755, and then delete the "install" folder from your website. Login to DLGuard by pointing your browser window to the "admin" folder in your DLGuard installation. Eg. http://www.example.com/dlg/admin
Please keep in mind that these instructions were for ADVANCED users only. For beginners and intermediate users, please view the installation instructions here.
Thank you for your on-going support, Sam
Stephens
|
|